Features: Ponds |  |
Creating a wildlife-friendly pond
When we moved into our current house, one of the most attractive features of the garden, for me, was the pond. It stood outside the kitchen window; just a few metres from the back door. It was originally a small semi-formal pond (with around 2 square metres surface area) and there was a shelf for marginal plants, but these had long since disappeared. It retained an attractive display of yellow flag (Iris pseudaclorus) around the edges though and, most exciting, a good population of frogs.
My children were around the ages four, seven and nine at the time we moved in and, since the pond was around 80cm deep, I felt that the youngest was at risk. I didn't want to get rid of the pond, so I covered it with a strong, fine wire mesh. One winter, after a particularly heavy snowfall, I found his footprints in the snow overlying this wire mesh (despite the fact that I had been 'watching' him play):  it pays to take precautions when it comes to children and ponds it pays to take precautions when it comes to children and ponds it pays to take precautions when it comes to children and ponds. it pays to take precautions when it comes to children and ponds.
I left gaps so that frogs could get under the wire mesh, but even so it was less than ideal for them. The mesh also made the pond very hard to maintain since access was so restricted. I soon began to harbour ideas of a bigger and better pond: one that would be designed with both wildlife and people in mind. The new pond would need to:
- be in a sunnier part of the garden;
- have extensive shallow areas (which the old one lacked);
- have low-maintenance edges;
- be designed with child-safety in mind (for visitors rather than my children who are now old enough to be respectful of the dangers).
In 2002 I started work.
Positioning the pond
I decided to create the new pond in a different part of the garden since the old pond was, to some extent, a barrier between the house and the rest of the garden.
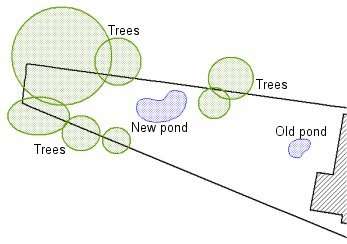 Position of new and old ponds
The new pond would be around half way up my garden (about 50 feet from the house) on the southern side of the northern boundary: just a about the sunniest part of the garden. Position of new and old ponds
The new pond would be around half way up my garden (about 50 feet from the house) on the southern side of the northern boundary: just a about the sunniest part of the garden.
It's easier to maintain a healthy pond ecology if you have plenty of sunlight at your disposal. You can always cut down on sunlight by using plants or structures to provide shade, but the option of increasing sunlight is not always so straightforward (if your pond is in the shade of a neighbour's hedge or your house for example). That's not to say that ponds cannot be created in shady conditions; but it is more problematic.
There were two problems with the chosen position. One was that it was on a slight slope of around 1 in 15 (though this would have been true almost anywhere in the garden). This would necessitate a fair bit of levelling when clearing the site and excavating the hole. Some literature states that the foot of a slope or a hollow, where water collects naturally, is the ideal site to place a garden pond: the logic being that this is a more natural situation. Other advice cautions against putting a garden pond in these locations because of the risk of nutrients and chemicals draining into, and concentrating in, the pond.
If, like me, you do not have a naturally wet site for your pond, don't feel bad about accommodating one in a less natural position: this is gardening after all!
My advice would be to check the site carefully for signs of these kind of problems before deciding to site the pond there: if it smells okay and it has a normal complement of plants and invertebrates, then you'll probably be okay. If, like me, you do not have a naturally wet site for your pond, don't feel bad about accommodating one in a less natural position: this is gardening after all!
The second, potentially more serious, problem was that the site for the new pond was quite close to a number of substantial deciduous trees (some belonging to me and some to my neighbours). These trees do not cast any shade on the pond for most of the day, but their shed leaves could be a problem if allowed to accumulate in the pond. In fact, I plan to create a 'woodland garden' behind the pond area eventually, so I would clearly need to bear the problem of leaves in mind and deal with it.
In a small garden, you would be very lucky indeed to find the ideal position for a pond: you must work with what you've got. As long as you are prepared for the problems you are likely to encounter and have some ideas for dealing with them, then you should not feel too nervous about 'breaking the rules' where needs must.
Pond profile design
The pond design most amenable to wildlife is a saucer-shaped depression with gently shelving edges, a muddy substrate and naturalistic planting:
 Profile of a naturalistic pond
the classic 'wildlife pond' design which has become more popular in conjunction with naturalistic garden designs. Because of the gently shelving sides and the naturalistic planting around and beyond the margins, the design does require a fair bit of room (if the pond is to reach an appreciable depth). Where space is limited, or the naturalistic design does not sit well with the rest of the garden, other semi-formal or formal designs can be employed. It is still possible, with imagination and good design, to make a semi-formal pond which is very amenable to wildlife and even a formal pond will be attractive to wildlife in many ways. Profile of a naturalistic pond
the classic 'wildlife pond' design which has become more popular in conjunction with naturalistic garden designs. Because of the gently shelving sides and the naturalistic planting around and beyond the margins, the design does require a fair bit of room (if the pond is to reach an appreciable depth). Where space is limited, or the naturalistic design does not sit well with the rest of the garden, other semi-formal or formal designs can be employed. It is still possible, with imagination and good design, to make a semi-formal pond which is very amenable to wildlife and even a formal pond will be attractive to wildlife in many ways.
In general, ponds should have an area where the depth reaches at least 60cm. This is a sufficient depth for most wildlife to survive winter conditions unharmed. If you are keeping fish, you may want to provide even more depth; perhaps down to a metre.
In general, the more gently shelving sides you can incorporate into the pond design, the better wildlife will like itIn general, the more gently shelving sides you can incorporate into the pond design, the better wildlife will like it. Gently shelving sides provide better access for animals like birds and mammals for bathing and drinking and also better means of egress for animals like frogs which can struggle to get out of a steep sided pond (sometimes resulting in drowning).
 Profile of my semi-formal pond. Maximum depth is one metre and there are substantial areas at 50cm. Shelves go all the way round, mostly at 30cm depth but at 20cm at the shelving 'beach' end.
The sloping sides should be effective over a range of pond depths: in the height of summer, evaporation will cause dramatic changes in water depth over quite short periods. A semi-formal design, should, if at all possible, have at least one gently shelving side. Profile of my semi-formal pond. Maximum depth is one metre and there are substantial areas at 50cm. Shelves go all the way round, mostly at 30cm depth but at 20cm at the shelving 'beach' end.
The sloping sides should be effective over a range of pond depths: in the height of summer, evaporation will cause dramatic changes in water depth over quite short periods. A semi-formal design, should, if at all possible, have at least one gently shelving side.
For my own pond, I selected a semi-formal design because I wanted to create a pond with a good maximum depth in a relatively restricted space. I also wanted to use hard landscaping around much of it for reasons of aesthetics, access and low-maintenance. The problems of steep sides were ameliorated by incorporating shelves all the way round for marginal plants, whose foliage can act as a bridge between the water and the shore during summer. One end of the pond has a much shallower profile where a stone 'beach' can be laid to provide easy access and egress for wildlife.
Pond construction
Advice on pond construction varies in the details, but there is general agreement on the main procedures. Here we will deal only with ponds made using flexible liners: pre-cast fibreglass and concrete or clay-lined ponds are a completely different proposition. Using a flexible liner is probably the easiest method: there is much less to go wrong than with the other methods. The major concern is to construct the pond in such a way that the liner is protected from the risk of puncture or degradation and the life of the pond is therefore maximised.
After the site of the pond has been selected, you should mark out the planned perimeter of your pondAfter the site of the pond has been selected, you should mark out the planned perimeter of your pond; perhaps using canes, sand or paint. Don't just mark it out and start digging: live with it for a few days at least. You will almost certainly make some adjustments, or even wholesale changes, if you take your time. The pond may last a quarter of a century or more, so a few days spent getting the design right will be worth itThe pond may last a quarter of a century or more, so a few days spent getting the design right will be worth it.
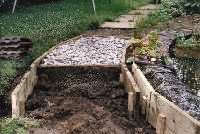
It is very important to make sure that the area to be occupied by the pond is level. I did this by knocking wooden stakes into the ground around the planned perimeter and using a builder's spirit level to ensure that they were all at exactly the same height. Because of the slope in my garden, this meant that I had to remove a fair amount of soil from one end of the pond and raise the ground level at the other (making very sure to compact the soil where I did so). Be warned; if you don't take the trouble to get the levels right, you could still find large areas of unsightly liner showing after the pond has been filled with waterif you don't take the trouble to get the levels right, you could still find large areas of unsightly liner showing after the pond has been filled with water.
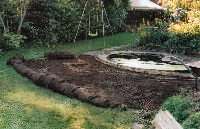
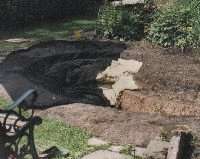
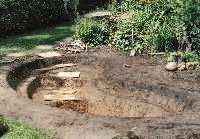 Pond hole: the foreground shows where the earth was built up to cope with the slope in the garden. (View bigger image.)
There's no great secret to digging: just lots of hard work. However, you will find that things go more easily if you do some planning first. You should plan where you will put the spoil you remove during digging. You are likely to remove topsoil, subsoil and a number of rocks and roots and you should know before you start where you intend to put each of these types. It is very easy to underestimate the amount of room required for the material you remove; remember that once its out of the hole, it is less compact and cannot be piled too steeply, so quite a bit of space is required if you are not removing it to a skip, or using it elsewhere immediately. Pond hole: the foreground shows where the earth was built up to cope with the slope in the garden. (View bigger image.)
There's no great secret to digging: just lots of hard work. However, you will find that things go more easily if you do some planning first. You should plan where you will put the spoil you remove during digging. You are likely to remove topsoil, subsoil and a number of rocks and roots and you should know before you start where you intend to put each of these types. It is very easy to underestimate the amount of room required for the material you remove; remember that once its out of the hole, it is less compact and cannot be piled too steeply, so quite a bit of space is required if you are not removing it to a skip, or using it elsewhere immediately.
It makes sense to avoid digging in wet weather or when the ground is baked hard. Remember to take your time.
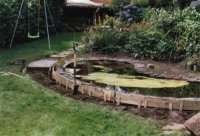
 Note the angled sides and the continuous shelf for marginal plants. (View bigger image.)
I tend to suffer with lower-back pain so I use a small 'border' spade when I do my digging: this means that there's less weight on the spade, but you obviously need to take more spade-loads. I had a number of well defined levels in my pond at 20, 30 50 and 100cm and I found it easiest to dig the whole area to 20cm first and then to 30cm, leaving the areas that needed to remain at 20cm, and so on. If, like mine, your pond will have a number of steep sides, these should not be vertical, but rather slope outwards slightly. This makes the sides of the pond more stable and, near the surface, allows ice with forms on the pond in winter to move upwards without compressing and causing damage. You should dig a further 5 to 15 centimetres more than the planned depth to allow for any cushioning you place under the liner and substrate you put on top. Note the angled sides and the continuous shelf for marginal plants. (View bigger image.)
I tend to suffer with lower-back pain so I use a small 'border' spade when I do my digging: this means that there's less weight on the spade, but you obviously need to take more spade-loads. I had a number of well defined levels in my pond at 20, 30 50 and 100cm and I found it easiest to dig the whole area to 20cm first and then to 30cm, leaving the areas that needed to remain at 20cm, and so on. If, like mine, your pond will have a number of steep sides, these should not be vertical, but rather slope outwards slightly. This makes the sides of the pond more stable and, near the surface, allows ice with forms on the pond in winter to move upwards without compressing and causing damage. You should dig a further 5 to 15 centimetres more than the planned depth to allow for any cushioning you place under the liner and substrate you put on top.
After the hole is dug, check the surface very carefully for stones and roots and anything else that could pierce the liner. Be careful and patient: the time you spend doing this now could save you a lot of time, anguish and money in the future by reducing the risk of punctures.
 Here you can see the liner underlay and, underneath that, the loft insulation that I used for cushioning. (View bigger image.)
Now you should place some cushioning material over the soil before putting the liner in to give the liner extra protection. Sand (about 5cm thick) is a good choice for a pond with gently shelving sides, but because my pond had some very steep sides I decided to use loft insulation. Sometimes materials such as newspaper or old carpet are recommended, but other people advise against materials such as these which will rot down. Over the cushioning material, you could then lay some purpose made underlay: this is a thin layer of fabric underlay that is extremely strong and resistant to puncturing. I used a product called 'polyfibrelay underlay' from Bradshaws Water Gardening. Here you can see the liner underlay and, underneath that, the loft insulation that I used for cushioning. (View bigger image.)
Now you should place some cushioning material over the soil before putting the liner in to give the liner extra protection. Sand (about 5cm thick) is a good choice for a pond with gently shelving sides, but because my pond had some very steep sides I decided to use loft insulation. Sometimes materials such as newspaper or old carpet are recommended, but other people advise against materials such as these which will rot down. Over the cushioning material, you could then lay some purpose made underlay: this is a thin layer of fabric underlay that is extremely strong and resistant to puncturing. I used a product called 'polyfibrelay underlay' from Bradshaws Water Gardening.
A good rule of thumb for calculating the size of liner you will need for your pond works as follows. First calculate the smallest rectangle that can completely contain the irregular outline of your pond.
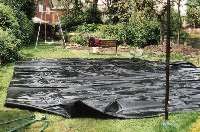 The full extent of the 8 by 5.5 metre pond liner. (View bigger image.)
Now add two times the maximum depth of your pond plus an extra metre (for overlap) to each dimension: that's the size of liner you should obtain. The 'minimum bounding rectangle' for my pond was 5 by 2.5 metres and since its maximum depth would be around 1 metre, I calculated that I needed a liner of 8 by 5.5 metres. The full extent of the 8 by 5.5 metre pond liner. (View bigger image.)
Now add two times the maximum depth of your pond plus an extra metre (for overlap) to each dimension: that's the size of liner you should obtain. The 'minimum bounding rectangle' for my pond was 5 by 2.5 metres and since its maximum depth would be around 1 metre, I calculated that I needed a liner of 8 by 5.5 metres.
The choice of pond liner is large, even from a single distributor. It is generally agreed that the best liners are made of butyl: they are strong, flexible and very long lasting (perhaps 40 or 50 years). Not surprisingly, butyl is also the most expensive material. You pays your money and takes your choice. I went for a mid-range material called called 'polylastic' from Bradshaws Water Gardening.
It is best to put the liner into the pond during fine weather because you can first unfold the liner and lay it out in the sun: this heats it up and makes it more flexible. Carefully pull the liner so that it is centred over the pond and push it gently into the hole.
What you do next depends on whether or not you plan to completely cover the liner with a soil substrate. This is a good technique for naturalistic wildlife ponds since it enables you to plant straight into the pond without using containers. However it is not easy to get an even covering of soil once the water is in the pond, so this must really be done before filling. So if you are making this sort of pond, you must now do your best to mould the liner to the contours of the pond by using its own weight and some gentle persuasion. Then you should cover the liner with another layer of the fibre 'underlay' so that plants rooting in the soil cannot damage it. With this done, you can spread a layer, perhaps 5 to 10cm thick, of subsoil or fine gravel over the whole thing. Don't use a nutrient-rich topsoil because that will lead to problems with algae which could take a lot of time to put right. Now you can put the hosepipe in; but fill it gently so that your soil substrate does not get washed into the centre of the pond.
If you are not planning to use a soil substrate over the entire pond, you can start filling with water from a hosepipe as soon as you've coaxed the liner into the hole. Put bricks, or some other heavy objects, on the extremities of the liner so that as the weight of the water pulls it into the hole, it remains fairly taught. As the liner is pulled into shape by the weight of the water, you must regularly go around the pond and fold the liner in such a way that it sculpts to the hole as neatly, and with as few folds, as possibleAs the liner is pulled into shape by the weight of the water, you must regularly go around the pond and fold the liner in such a way that it sculpts to the hole as neatly, and with as few folds, as possible. This is much harder than it sounds, particularly with a very irregularly shaped pond. Don't worry too much about unsightly folds; substrate and/or marginal planting should hide them from view as the pond matures.
Never trim the liner until the pond is completely filled with water! Early trimming can lead to expensive mistakes. You will need to leave about 40cm overlap around the pond. Lay about 20cm of the overlap over the ground and bury the remainder well. Edge construction
There are as many ways of designing a pond edge as there are ways of designing a pond. The pond edge is a critical feature: the way it looks and works has a crucial influence on the whole look and feel of the pondThe pond edge is a critical feature: the way it looks and works has a crucial influence on the whole look and feel of the pond. Most naturalistic ponds have vegetation going right up to the water's edge and this is, undoubtedly, the most wildlife-friendly approachMost naturalistic ponds have vegetation going right up to the water's edge and this is, undoubtedly, the most wildlife-friendly approach. To achieve this, once you have buried the edge of your liner, you can lay turfs over the exposed liner at the edge of the pond. If you want to plant directly into the ground at this margin, lay the turfs upside down; the grass roots keep the soil bound together until your planting takes over. A naturalistic edge, like the rest of the naturalistic pond, is not a low maintenance optionA naturalistic edge, like the rest of the naturalistic pond, is not a low maintenance option. To keep good access to the pond, you will have to keep the vegetation under control, perhaps mowing to the very edge of the pond. You will also need to ensure that the vegetation around the pond does not encroach too vigorously on the pond itself.
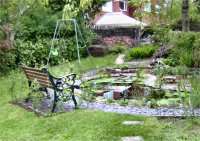
The alternative to a naturalistic edge is some sort of hard-landscaped one. Wildlife will still used a pond with a hard-landscaped edge, and with imagination and good design, it needn't be a serious handicapWildlife will still used a pond with a hard-landscaped edge, and with imagination and good design, it needn't be a serious handicap. I designed my pond with the intention of hard landscaping the pond edge, but I did not have a firm idea of what materials to use. Once the pond had been filled, I wanted to cover the exposed liner around the edge with something to prevent the sun damaging it and, casting around the garden, I found some spare roof-tiles of just the right dimensions. As soon as I laid them over the liner, I was struck by how good they looked: they gave just the kind of semi-formal feel I liked. I decided to make them a permanent feature. Whether you use stone, slabs, tiles or something else, you will need to cement them into place. Take care to prevent cement from dropping into the pond, but if it does, fish as much out as you can.
Around the longest curve of my kidney-shaped pond I wanted to have a path, but I was keen to soften the edges of this, and the pond itself, by planting between the path and the pond edge. I achieved this by incorporating an extremely narrow bed of some 5cm. (That's about as narrow as flower beds come!) I decided to create the path using plum-slate chippings which complemented the edge tiles nicely. The path was bounded using a gravel boards and the adjacent narrow bed was also bounded on the pond side by another gravel board. The pond edge tiles were laid so that their edge was directly over this gravel board. A 5cm wide bed might seem to be very narrow, but it is sufficient to grow plants which will soften both the pond and path edges without giving them enough soil to grow away too vigorously.
SubstratesWildlife will benefit most from your pond if it contains a variety of substratesWildlife will benefit most from your pond if it contains a variety of substrates, e.g. mud, rocks, stones, wood, gravel and so on. Remember, heterogeneity is the key. If you've used a protective layer over your liner, you can place stones and rocks into the pond with impunity. If you've adopted a more formal approach,
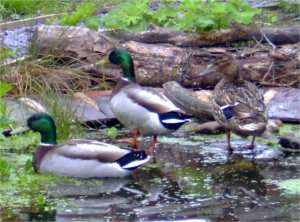 This picture of a group of mallards which visited the pond clearly shows how the stone 'beach' creates areas of very shallow water where birds and other animals can get access to water of all depths.
without an extra layer of protection over the whole liner, then you must be a bit more cautious. If you need to put any large stones, bricks or rocks into the pond, as a precaution against puncturing the liner, use scraps of unused underlay, or other material (e.g. carpet), between them and the liner. This picture of a group of mallards which visited the pond clearly shows how the stone 'beach' creates areas of very shallow water where birds and other animals can get access to water of all depths.
without an extra layer of protection over the whole liner, then you must be a bit more cautious. If you need to put any large stones, bricks or rocks into the pond, as a precaution against puncturing the liner, use scraps of unused underlay, or other material (e.g. carpet), between them and the liner.
In the gently shelving shallow end of my pond which ranges from a depth of about 15cm down to 30cm I put a layer of scraps of the liner underlay, on top of which I created a 'beach' from natural stones and small rocks. No matter what the weather and level of the pond, there are always some stones in this part of the pond which are part in and part out of the water; providing easy access to the water for birds and other animals. This kind of rocky substrate also provides invaluable hiding places for invertebrates, frogs etc. Being shallow, it is the first part of the pond to warm up during the day and tadpoles like to congregate in this area. All the frogs which spawned in the new pond during its first spring, did so in this area. I have also placed a few branches (that had been submerged in the old pond) into this area of the pond to enrich the habitat.
The soil in the planting crates forms a valuable wildlife habitat in the pond and because of this, I like to keep it exposed rather than dress it with gravel as is often advised.
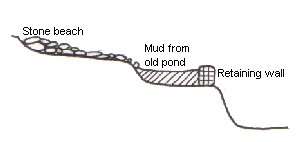 Profile of my pond showing the stone beach, mud and retaining wall.
The reason usually given for this advice is that it prevents the soil from being disturbed by fish or wildlife and thence clouding the water; but I've never found this to be a problem. Because it is such a valuable habitat for wildlife, it's worth making an extra effort to incorporate some more mud in a semi-formal pondBecause it is such a valuable habitat for wildlife, it's worth making an extra effort to incorporate some more mud in a semi-formal pond; especially if you can obtain it, complete with invertebrate fauna, from an existing pond. In my pond, I have an extensive level at 50cm just before the deepest part at 1m. I made a retaining wall (using habitat baskets), at this junction and filled the area behind with mud from our old pond before I got rid of it. Profile of my pond showing the stone beach, mud and retaining wall.
The reason usually given for this advice is that it prevents the soil from being disturbed by fish or wildlife and thence clouding the water; but I've never found this to be a problem. Because it is such a valuable habitat for wildlife, it's worth making an extra effort to incorporate some more mud in a semi-formal pondBecause it is such a valuable habitat for wildlife, it's worth making an extra effort to incorporate some more mud in a semi-formal pond; especially if you can obtain it, complete with invertebrate fauna, from an existing pond. In my pond, I have an extensive level at 50cm just before the deepest part at 1m. I made a retaining wall (using habitat baskets), at this junction and filled the area behind with mud from our old pond before I got rid of it.
Planting
If you've gone for the full naturalistic wildlife pond with a layer of soil over the whole thing, you can plant straight into the pond bottom, otherwise plants can go into special mesh crates and be arranged on the shelves which you have created for the purpose. The advantage of using crates, like conventional container gardening, is that you can move them around and generally control the spread of the plants more easily.
Some of our most beautiful native plants are found in wetland areas and you are really spoilt for choice when it comes to choosing plants for your pondSome of our most beautiful native plants are found in wetland areas and you are really spoilt for choice when it comes to choosing plants for your pond. Many nurseries sell these plants already potted up in the special aquatic planting crates. I bought many of my plants over the internet through a company called Merebrook Water Plants. They also sell accessories like the planting crates. Pond plants are often split into categories depending on their growing habits and preferences. These groups are described below.
The submerged oxygenators grow almost entirely under the water. They can often be very abundant; providing a vital underwater structural element for wildlife and oxygenating the water. In my pond I use the following native submerged oxygenators:
- Hornwort Ceratohpyllum demersum. This plant does not need to be rooted, it can just be thrown into the water. This species makes up the bulk of my submerged oxygenators.
- Curly pondweed Potamogeton crispus. Much less vigorous that the hornwort but very elegant. This plant needs to be rooted in small pots which I've lodged in amongst the stones in the shallow area of the pond where it seems to do reasonably well.
Free floating plants are exactly that: not rooted and floating near the surface of the pond. In my pond I have the following native species:
- Duckweed Lemna minor. Abundant and very vigorous. Needs constant controlling (like cutting a lawn) but is also very useful.
- Water soldier Stratoites aloides.
Aquatics are rooted at the bottom of the pond (often very deep) but send up leaves and flowers which float on the surface. I have the following native aquatics in my pond:
- White water lilly Nymphaea alba.
- Fringed water lilly Nymphaea peltata.
In addition I also have the following non-native aquatic:
- Cape pondweed Aponogeton Distachyos. I couldn't resist this one because it is supposed to flower for 11 or 12 months of the year.
The emergents are plants which are normally rooted at depths of between 15 and 60cm. I have used the following native emergents:
- Bog bean Menyanthes trifoliata.
- Flowering rush Butomus umbellatus.
- Lesser reedmace Typha angustifolia.
Marginal plants normally grow at a maximum depth of 15cm or less. In fact many marginals do just as well away from the pond as long as conditions are fairly wet. Some of the plants I have listed as marginals below are, in fact, more normally found in damp ground. I have used the following native marginals in my pond:
- Brooklime Veronica beccabunga.
- Wood dock Rumex sanguineus. This species is more usually associated with wet ground.
- Water forget-me-not Myosotis scorpiodes.
- Cotton-grass Eriophorum angustifolium.
- Lesser spearwort Ranunculus flammula.
- Water avens Geum rivale. Another species which is normally associated more with damp ground.
- Yellow flag Iris pseudacorus.
- Water plantain Alisma plantago-aquatica.
- Marsh marigold Caltha palustris.
- Purple loosestrife Lythrum salicaria.
- Water mint Mentha aquatica.
- Water cress Nasturtium officinale.
I have also planted the following non-native marginals:
- Lobelia cardinalis.
- Blood-drop emlets Mimulus luteus.
Look carefully at the information which comes with the plants you buy; it should indicate the kind of depth at which they can be planted. The given depth should be measured from the surface of the water to the surface of the soil (not the bottom of the crate). If the position where you wish to place the plant is too deep, place some level stones or bricks in first and put the crate on the platform you've made; but don't forget to protect the liner.
Child safetyOne of your biggest considerations when designing and constructing a pond of any sort should be safetyOne of your biggest considerations when designing and constructing a pond of any sort should be safety. This is particularly important if young children are likely to come into contact with it. Even if you don't have children yourself, you should consider the safety of visiting children. If there's any likelihood whatsoever that children could be at large in the garden with minimal, or no, supervision, then you should take precautions.
The naturalistic wildlife pond, with its gently shelving sides, is one of the safer designsThe naturalistic wildlife pond, with its gently shelving sides, is one of the safer designs since the deep water is usually not near the edges and it is easier for a child to get out if he or she falls in. A pond profile like mine, which has steep sides and deep areas close to the edge, is more dangerous. There are two basic options for making a pond like this safer. One is to cover the pond with something which will support the weight of a child who falls in and the other is to restrict access to the pond edge.
In my old pond I opted to cover the surface with a strong wire mesh which I pegged securely to the surrounding ground with tent pegs at intervals of about 10-15cm. After a short while, vegetation grew through the mesh at the edges and made it virtually immovable. The problem with this option is that it does make pond maintenance very difficult and as well as restricting access to the pond for humans, it also has the same effect for much of the wildlife. Obviously the mesh also detracts from the appearance of the pond considerably. Nevertheless, we got considerable enjoyment from our old pond and it still attracted a fair amount of wildlife.
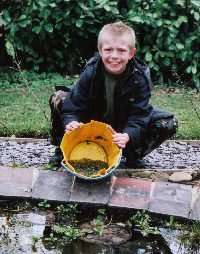 My son, Oliver transferring frog-spawn from our old pond to the new.
When designing the new pond I first intended to construct some sort of moveable wire mesh that could be placed over the pond when necessary but just as easily removed and stored when not required. This idea proved to be too problematic and instead I settled on a plan of being able to completely isolate the pond from the rest of the garden. I've planted a hedge on the outside of the path which runs adjacent to the long curve on the pond. Together with the garden boundary, short dry-stone wall and a couple of gates (these still in the planning stages), I will be able to prevent small children from reaching the pond without supervision. This wont be a recipe for me to relax and leave small children to themselves in the garden: it is just a safety measure that mitigates a little against the possibility of them getting to the pond without supervision. I would much rather be with them in the garden, showing them the pond and explaining the need to be careful to them. My son, Oliver transferring frog-spawn from our old pond to the new.
When designing the new pond I first intended to construct some sort of moveable wire mesh that could be placed over the pond when necessary but just as easily removed and stored when not required. This idea proved to be too problematic and instead I settled on a plan of being able to completely isolate the pond from the rest of the garden. I've planted a hedge on the outside of the path which runs adjacent to the long curve on the pond. Together with the garden boundary, short dry-stone wall and a couple of gates (these still in the planning stages), I will be able to prevent small children from reaching the pond without supervision. This wont be a recipe for me to relax and leave small children to themselves in the garden: it is just a safety measure that mitigates a little against the possibility of them getting to the pond without supervision. I would much rather be with them in the garden, showing them the pond and explaining the need to be careful to them.
By supervising children as they marvel at the wonders contained in a pond and, at the same time, teaching them about the dangers of water, they will learn to respect it without fearing it
As a rule of thumb I would say that unless you are completely confident in a child's understanding of the dangers then he or she should not be left unsupervised in a garden with a pond; even one which incorporates extra safety measures. At the same time I believe that we should keep the dangers in perspective: there's probably more to worry about every time
we put our children into a car or wave them off as they make their way down a busy road to school. The key is good supervision and teaching children to respect the dangers presented by water. By supervising children as they marvel at the wonders contained in a pond and, at the same time, teaching them about the dangers of water, they will learn to respect it without fearing it.
| First published May 2003. Last revised January 2004. | |
Copyright Richard Burkmar 2003. Permission is hereby granted for anyone to use this article for non-commercial purposes which are of benefit to the natural environment as long the original author is credited. School pupils, students, teachers and educators are invited to use the article freely. Use for commercial purposes is prohibited unless permission is obtained from the copyright holder. |
Back to home page
Do you live in Merseyside? Interested in its wildlife? |